Create a dll
Flowcode allows the use of DLLs in simulation. This page explains a possible way to create your own DLL for use with Flowcode.
Contents
Requirements:
To create a DLL a compiler is required. Microsoft provides Visual Studio Community edition for free (certain restrictions apply, see the FAQ on the page). The installer is relatively small, however it will download and install all required software which (depending on your internet connection) might take considerable time.
This walkthrough assumes the reader is familiar with the C language as the code for the DLL will be written in C.
Create a DLL project
All code and associated settings in Visual Studio are stored inside a project. As we are creating a DLL we need to appropriate project.
- From the FILE menu, select New->Project.
- In the left pane, select Installed, Templates, Visual C++, Win32. In the right pane select Win32 Console Application
- In the bottom pane enter the name for the application and a solution name. We will use 'DemoDLL' for the Name and 'DynamicLibraries' for the Solution Name.
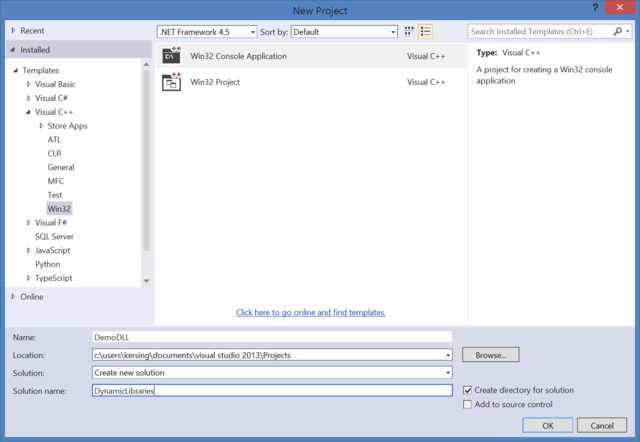
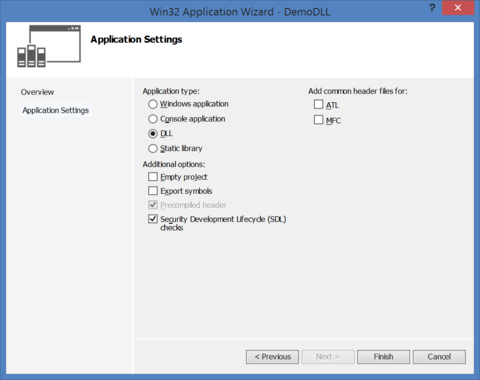
- Choose the OK button to create the project. This opens the Win32 Application Wizard. Choose the Next button on the first page of the wizard.
- On the Application Settings page, select DLL and choose the Finish button.


Add code to the project
For this demonstration we will implement a few simple functions to show how various data types are passed between Flowcode and the DLL.
The functions are:
- unsigned char GetCounter() - Returns the current counter value (0-255) and increments it
- ResetCounter() - Resets the counter to zero
- bool GetCounterString(TCHAR *string, DWORD size) - Returns the current counter value as a string
First we create a new file with the definitions of the functions:
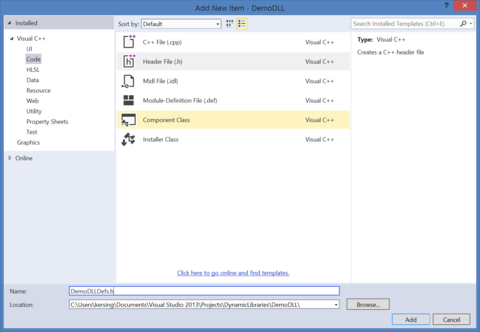
- In PROJECT choose menu item Add New Item.
- In the left pane, select Installed, Visual C++, Code. In the right pane select Header File (.h).
- At the bottom, enter a usefull Name. We will use DemoDLLDefs.h, next choose the Add button.
- Add the following code to the file and save:

#ifdef DEMODLL_EXPORTS
#define DEMODLL_API __declspec(dllexport)
#else
#define DEMODLL_API __declspec(dllimport)
#endif

#ifdef __cplusplus
extern "C" {
#endif

	DEMODLL_API unsigned char GetCounter();
	DEMODLL_API void ResetCounter();
	DEMODLL_API bool GetCounterString(TCHAR *str, DWORD size);

#ifdef __cplusplus
}
#endif
While creating the project Visual Studio automatically created a define for the symbol DEMODLL_EXPORTS. In the definitions it is used to select the dllexport specification when compiling the DLL code. The extern "C" code is added to make sure the compiler generates code using the correct calling convention. (C uses plain names, C++ adds information to functions to allow for overloading)
Next a couple of project options need to be set:
- Select DemoDLL Properties in the PROJECT menu.
- In the Configuration drop down select All Configurations
- Set the Character Set to Not Set
- In the left pane select Configuration Properties, General
- Select the drop down to the right of Character Set, select Not Set.
- Choose the Apply button

- Allow use of less secure string manipulation functions:
- In the left pane select Configuration Properties, C/C++, Preprocessor.
- Modify the Preprocessor Definitions, include _CRT_SECURE_NO_WARNINGS; between WIN32; and <different options>.
- Click outside the definitions line and choose the OK button.


Finally we implement the functions.
- Open the DemoDLL.cpp tab.
- Add the following code and save:
- include "stdafx.h"
#include "stdafx.h"
#include "DemoDLLDefs.h"
#include <tchar.h>
#include <stdio.h>

#ifdef __cplusplus
extern "C" {
#endif

	static unsigned char counter = 0;

	unsigned char GetCounter()
	{
		return counter++;
	}

	void ResetCounter()
	{
		counter = 0;
	}

	bool GetCounterString(TCHAR *str, DWORD size)
	{
		DWORD required = 0;
		TCHAR buffer[40];

		_stprintf(buffer, "%d", counter);

		required = _tcslen(buffer);
		if (IsBadWritePtr(str, required))
		{
			SetLastError(ERROR_INSUFFICIENT_BUFFER);
			return FALSE;
		}

		_tcsncpy(str, buffer,size - 1);
		return TRUE;
	}

#ifdef __cplusplus
}
#endif
Compilation & Installation
The everything required has now been created. The next step is to compile the code:
- At the top of the screen, just below the menu bar there is a drop down Debug. Select the down arrow and choose Release.
- In the BUILD menu choose Build Solution.
- After successful compilation the output window at the bottom of the screen should list something like DemoDLL.vcxproj -> C:\Users\kersing\Documents\Visual Studio 2013\Projects\DynamicLibraries\Release\DemoDLL.dll.
- Browse to the directory listed in the output window and copy the file DemoDLL.dll to the Components\dll' folder of your Flowcode installation. (Usually C:\Program Files (x86)\Flowcode 7\Components\dll)
Test
Use Demo.fcfx to test your newly created DLL. Output will appear in the Component Debugger window (open from the View menu if not already open).