Difference between revisions of "SCADA Getting Started"
| Line 19: | Line 19: | ||
Once the template has been selected you can begin to create your SCADA project. From here creating a SCADA project is very similar to using Flowcode embedded, if you are unfamiliar with using Flowcode embedded then you should go through the [[Flowcode_Help_Overview|Flowcode Help Overview]] section on the wiki to ensure you are comfortable with how to use the Flowcode environment. | Once the template has been selected you can begin to create your SCADA project. From here creating a SCADA project is very similar to using Flowcode embedded, if you are unfamiliar with using Flowcode embedded then you should go through the [[Flowcode_Help_Overview|Flowcode Help Overview]] section on the wiki to ensure you are comfortable with how to use the Flowcode environment. | ||
| − | + | ||
| + | Once you are comfortable using the Flowcode environment you can move on to creating a SCADA project. You may have noticed that there are fewer component categories than there are in embedded Flowcode, this is because only components which are SCADA capable are shown when creating a SCADA project. Some components are SCADA only and some components exist in both SCADA and embedded Flowcode. | ||
| + | |||
| + | |||
| + | [[File:Scada_components.png]] | ||
| + | |||
| + | |||
| + | For creating SCADA projects we would recommend that you use the [[Using_the_Project_Explorer|Project Explorer]] to create your project. In the picture below the components section will contain the functions for all the components added to the project. From here you can drag and drop required functions onto your flowchart. | ||
| + | |||
| + | [[File:Scada_project_explorer.png]] | ||
| + | |||
| + | |||
| + | ===Deploying your Project=== | ||
| + | |||
| + | Once you have finished your SCADA project you may want to create a standalone deployment of your SCADA project. | ||
Revision as of 09:11, 4 September 2019
Contents
Getting Started with SCADA
Loading a SCADA Project
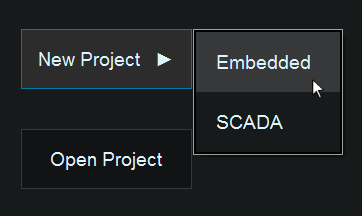
When Flowcode has loaded, you will be presented with a Start Page which allows you to start a new Project, if you click on this button a side menu will slide out and to start a SCADA project, select the "SCADA" option.
Selecting an API Template
Once you have clicked on the new SCADA project button, a window will appear which asks you to select a template. Choose a template by selecting the appropriate button and clicking on the "Load" button in the bottom-right. If you do not want to select a template and simply start a new project, ensure the "Blank Project" button is selected before pressing "Load".
Creating your Project
Once the template has been selected you can begin to create your SCADA project. From here creating a SCADA project is very similar to using Flowcode embedded, if you are unfamiliar with using Flowcode embedded then you should go through the Flowcode Help Overview section on the wiki to ensure you are comfortable with how to use the Flowcode environment.
Once you are comfortable using the Flowcode environment you can move on to creating a SCADA project. You may have noticed that there are fewer component categories than there are in embedded Flowcode, this is because only components which are SCADA capable are shown when creating a SCADA project. Some components are SCADA only and some components exist in both SCADA and embedded Flowcode.
For creating SCADA projects we would recommend that you use the Project Explorer to create your project. In the picture below the components section will contain the functions for all the components added to the project. From here you can drag and drop required functions onto your flowchart.
Deploying your Project
Once you have finished your SCADA project you may want to create a standalone deployment of your SCADA project.


