Oscilloscope
<sidebar>Sidebar: Flowcode Help Overview:ToolsViews</sidebar>
Oscilloscope Introduction
Flowcode now includes a 4 channel, fully triggering oscilloscope, ideal for testing your applications in both hardware and simulation. It works alongside Ghost Technology to allow users to monitor signals in real time.
Scope Overview
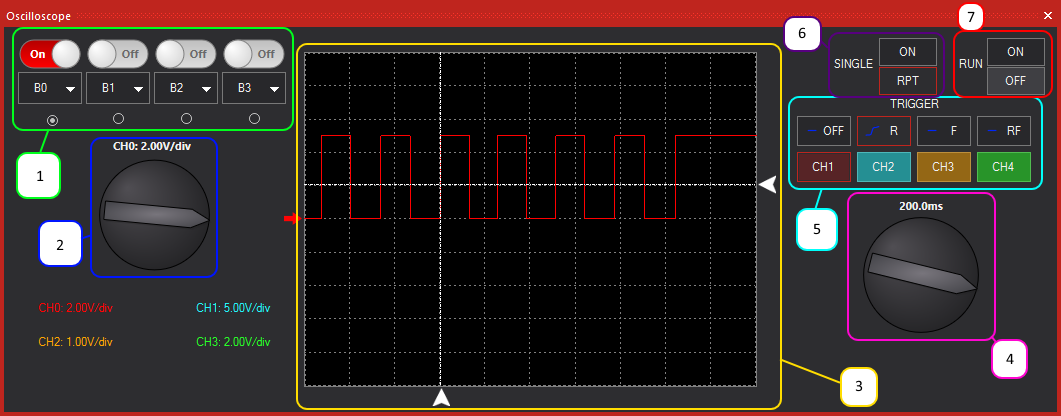
Below is an annotated screenshot of the Flowcode oscilloscope, indicating features and controls.
Green: Select which of the 4 channels you wish to display using the on/ off buttons. Below the channel select is a drop down box, allowing users to select which microconrtoller pin is monitored by the oscilloscope. The radio buttons below each channel are used to select the focus of the volts/ div dial below.
Blue: Select the vertical scale (Volts/div) of the selected channel. Note, this can be different for each channel, to suit your requirements.
Yellow: The main viewing window of the oscilloscope. Any channels switched ON are presented in this window. The trace colour matches the channel. For example, Channel 1 = RED. The small triangle icons on the axes are the triggering cursors. Explained in point 5.
Pink: Users can select the time base of the oscilloscope here. Note, the time base is the same for each of the 4 channels, and cannot be individually set. It is measured in s/div.
Turquoise: Users select their triggering options in this window. Select which channel the oscilloscope will trigger from, and on what edge of the signal; rising, falling or rising AND falling.
Purple: Users configure the run prooperties of the scope here. If single mode is enabled, the scope will run until a trigger occurs and stop monitoring signals. If RPT (repeat) is enabled the scope will continue to run indefinitely.
Red: This option allows users to switch the scope ON/ OFF.
